Octopress Blog Tweaks: Adding Author Info Section Below Each Posts
OctopressA good blogging platform is one which allows easy customization. I've been using Octopress for more than 2 weeks and happy to tell that it's one of those allows customization with out any pain. I want to share a tweak I added to my blog recently : It's an author information section below every post. Let's see how I built it and added to my blog.
What we're going to achieve #
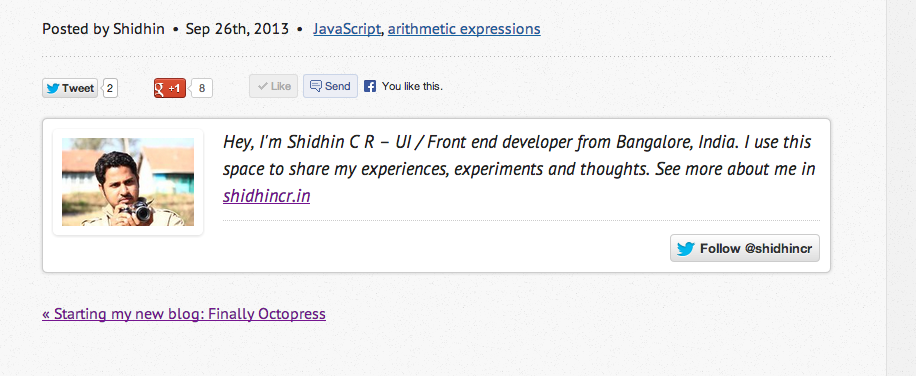
See the above screenshot ? It's a simple section containing the author image, description and a twitter follow button. I'll explain how to build this and add to every post.
Let's Begin #
Octopress is basically based on Jekyll and liquid templating. Everything in the main view is broken-down to subviews called partials. These partials are nothing but re-usable html files which will be included in other views. So for creating our author information section, we also need to create a partial and include it in the post view.
Before start creating our author information view, let's analyse the files and folders we're interested in.
Open the octopress blog folder and get familiar with these:
- source/_layouts/post.html
- source/_includes/custom/
- sass/custom/_styles.scss
- source/images/
source/_layouts/post.html
This is the partial responsible for rendering the blog post entry. We need to make modifications in this view to show any changes in the post.
source/_includes/custom/
This folder contains custom partials –– usually from the 3rd party plugins and all. We're going to add our view html file here only.
sass/custom/_styles.scss
Octopress uses SCSS ( a CSS preprocessor ) for all of it's styling and theming. This particular file will be processed at the end, hence any custom styles required for the blog are added in this file only.
source/images/
All the image assets goes to this folder.
Time to create the view for the author information section. I've created a new file called "aboutauthor.html" (code is given below ) and placed in the source/_includes/custom/ folder. It's just the sample and you can create your own template.
aboutauthor.html
<div class="about">
     <span class="about-image">
          <img src="/images/author.jpg" alt="author name">
     </span>
     <span class="about-desc">
          <span>Lorem ipsum dolor sit amet, consectetur adipisicing elit, sed do eiusmod
          tempor incididunt ut labore et dolore magna aliqua. Ut enim ad minim veniam,
          quis nostrud exercitation ullamco laboris nisi ut aliquip ex ea commodo
          consequat.</span>
          <br/>
          <hr/>
          <a href="https://twitter.com/yourtwittername" class="twitter-follow-button" data-show-count="false" data-size="large">Follow @yourtwittername</a>
     </span>
</div>
The above code is self explanatory. One more extra effort is to add the author image –– which should go to the source/images/ folder. I've used a jpeg image of dimension 175x120.
To apply some CSS for our view, open the "_styles.scss" and add the following rules.
.about {
     font-style: italic;
     background-color: #FFF;
     padding: 10px;
     border-radius: 5px;
     border: 1px solid #CCC;
     box-shadow: 0 0 5px #CCC;
     overflow: hidden;
     clear: both;
     .about-image {
          width: 150px;
          float: left;
          display: inline-block;
          margin-right: 20px;
     }
     .about-desc > hr {
          border: none;
          border-top: 1px dotted #CCC;
          padding-top: 10px;
     }
     #twitter-widget-1 {
          float: right
     }
}
Update Post Template #
Now we've the CSS and Markup ready for our author information view. We can add the "aboutauthor.html" view to any other view by using include keyword. Let's open the source/_layouts/post.html partial and include our newly created view below the post content.
Preview it #
Use below rake commands to preview the blog.
rake generate; rake preview
That's it !! The author information section should be appearing below each blog post by now. Replace the "Lorum ipsum" with the words best describes you.
Thanks for reading, feedbacks are welcome. Enjoy blogging !!